Hope you guys had a restful weekend! Today I’m going to talk about my favorite design topic ever – CSS. If you’re following my other blog Earl Grey, you may have seen my Intro to CSS + Cheat Sheet post (find my updated cheat sheet here). Some of this might be a repeat, but I thought it would be a good idea to create a brand new love letter to CSS.
What is CSS?
CSS stands for Cascading Style Sheets. It is HTML‘s partner in crime and the best way to style websites, blogs, plugins, etc. When you add CSS codes to your stylesheet, you can override what was previously written. This is where CSS gets the “cascading” part of its name. You don’t necessarily have to go back into your codes and find the one you want to change (unless you want to).
What does CSS look like?
CSS is made of selectors, properties, and values. The selector is the element you are styling. It can be classified as an id, class, paragraph, link or a section of your page (div, span, etc). An id always begins with a hashtag while a class begins with a period. The id selector will style one main area, but the class selector can style several elements within a class.
If I wanted to change the body text of all of my blog entries to Tahoma, my CSS code would look like this: .entry {font-family:tahoma;}. Below is an example of what more loaded CSS codes could look like:
#nav-primary {
margin: 0 auto;
padding: 5px;
width: 1100px;
padding: 5px;
background: #fff;
}
.nav-menu-item {
color: #000;
font-family: georgia;
font-weight: 500;
text-transform: uppercase;
letter-spacing: 2px;
}
As you can see, I’m first styling my navigation bar with an id (#nav-primary), which controls just the menu itself. Then I’m using the class selector (.nav-menu-item) to style each link within the menu. The spacing of your CSS codes isn’t very important. Basically it just adds organization. The most important thing to pay attention to in your coding is the placement of the colons, semi-colons, and brackets.
Why You Should Use CSS
- Your website will look and feel cleaner. CSS allows you to quickly add margins and padding to elements, making your design look professional and intentional. Your coding itself will also be more organized. With CSS, you can edit several elements in just one line of code. You don’t have to go into every single post, page, etc in order to change the style of a specific element.
- It’s SEO friendly! This means your chances of getting traffic from search results in search engines will be higher. There are several elements of your blog that you can choose to either create in Photoshop or by CSS. I always recommend trying to create blog elements using CSS. For example, suppose you want add a colorful sidebar heading labeled “Design Freebies”. It might be tempting to just create a rectangle in Photoshop, add some text and upload it to your blog. But if you use plain text and customize it with CSS, it’ll be easier for search engines to pick up on it.
- It’s fast. This is helpful if you’re like me and change up color schemes often. You can go into your CSS Editor and change the background colors, fonts, hover effects, etc. super quickly. No editing/saving/uploading has to be done.
- It’s fun. I know, I know, this is subjective. But I personally could work with CSS codes all day. It’s so fun to experiment with different selectors and attributes and see what beautiful blog elements you can make. Want to make your profile picture rounded? Use CSS. Need to create a pretty drop-down menu with hover effects? CSS. The possibilities are endless and answers to your coding questions are always somewhere out there. I literally googled my way through CSS.
Where to Insert CSS Codes
Most blog platforms come with a special space for you to insert CSS. In WordPress, I always use the Editor section under “Appearance” in my Dashboard. In Blogger, you can add CSS in the “Advanced” section of the Template Designer.
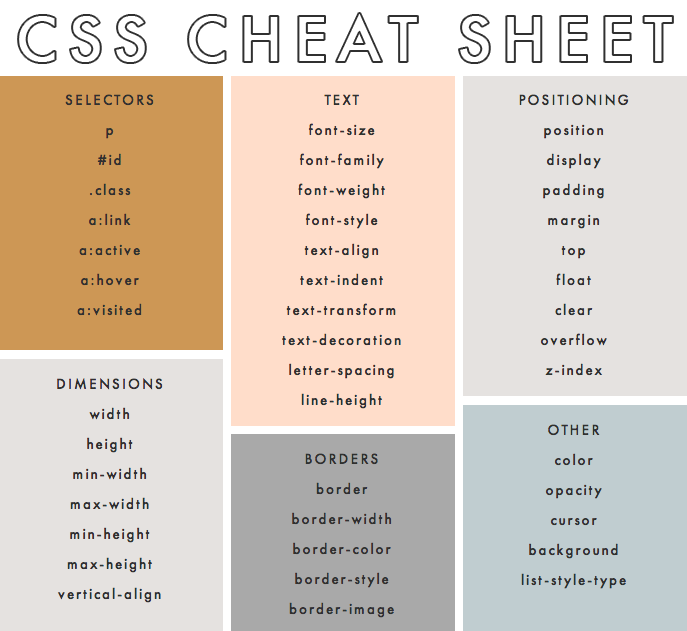
CSS Cheat Sheet
There are so many different codes you can add to your CSS stylesheet in order to make your blog or website visually appealing. I created this cheat sheet a while ago but recently added a few elements. I also recreated it using CSS (rather than using a Photoshop graphic). Visit this page to see the updated cheat sheet and definitions for each property.
Enjoy! I hope you all are looking forward to CSS tutorials in the future. Is there anything you’ve always wanted to learn to code? Let me know.


Laura says
I used a template for my blog as I’m a complete beginner at coding and I’m now at a stage where I want to start customising it (and getting rid of the bits I don’t want!). I’m pinning this cheat sheet for when I get a bit more confident to play around with it!
P.s. I used your post from EarlGrey to do my first collage this week – it’s not perfect by any means and it took me AGES but I did it – thanks so much!! :)
http://www.fitfoodfun81.blogspot.com
Alex says
Love how you’ve simplified CSS into a simple, easy-on-the-eyes cheat sheet. My semester ended recently, and this is a great way to jump back into it.
Nati says
thanks for the content! you made it simple ;)
Floe says
Great post. I learnt alot. Will hopefully come back to read this when I start my blog. Good work